Recently I gone through the webdriver and then I thought to configure it with Selenium grid. On selenium grid site they have mention how to configure it but it's not in details so i though to write that on this blog.
To configure webdriver with Selenium grid you require grid2.
Prerequisites.
We will see two things in Selenium Grid.
Run Testcases in parallel.
In this example we will run testcases of GridWithWebdriver and GridWithWebdriver1 class on Internet Explorer.
GridWithWebdriver.java
Testng.xml
Now in order to run using testng.xml we need to start the Grid hub and two remote control with Iexplore as browser.
Now to start the Grid and remote control open CMD and navigate to folder where Grid2 jar (selenium-server-standalone-x.x.x.jar) file is located and use the following commands
To start the Grid Hub
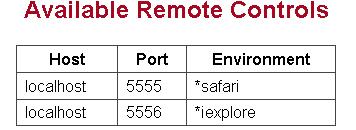
After this open http://localhost:4444/grid/console in you browser. You should be able to see something like below image.

Now if you will run using testng.xml you will see two Internet explorer will open and one will execute test_first() and test_second() while another will execute test_third() and test_fourth() in parallel.
Run same testcases on different browser in parallel.
In this example we will execute GridWithWebdriver tests on Firefox and Internet Explorer in parallel.
To do so you need to modify you testng.xml as below.
Testng.xml
Now to start the Grid and remote control open CMD and navigate to folder where Grid2 jar (selenium-server-standalone-x.x.x.jar) file is located and use the following commands
To start the Grid Hub

Now if you will run above test case one Firefox and one IE will launch and both test_first() and test_second() will execute in both browser simultaneously.
To configure webdriver with Selenium grid you require grid2.
Prerequisites.
- TestNG
- Grid2
Download the selenium-server-standalone-version.jar from the below location.
Download Grid2
We will see two things in Selenium Grid.
- Run Testcase in parallel
- Run same testcase on different browser in parallel for browser compatibility testing.
Run Testcases in parallel.
In this example we will run testcases of GridWithWebdriver and GridWithWebdriver1 class on Internet Explorer.
GridWithWebdriver.java
/**
 * @author Gaurang Shah
 * To Demonstrate how to configure webdirver with Selenium Grid
 */
import java.net.MalformedURLException;
import java.net.URL;

import org.junit.AfterClass;
import org.openqa.selenium.*;
import org.openqa.selenium.remote.DesiredCapabilities;
import org.openqa.selenium.remote.RemoteWebDriver;
import org.testng.annotations.*;

public class GridWithWebdriver {

 public WebDriver driver;

 @Parameters({"browser"})
 @BeforeClass
 public void setup(String browser) throws MalformedURLException {
  DesiredCapabilities capability=null;

  if(browser.equalsIgnoreCase("firefox")){
   System.out.println("firefox");
   capability= DesiredCapabilities.firefox();
   capability.setBrowserName("firefox");
   capability.setPlatform(org.openqa.selenium.Platform.ANY);
   //capability.setVersion("");
  }

  if(browser.equalsIgnoreCase("iexplore")){
   System.out.println("iexplore");
   capability= DesiredCapabilities.internetExplorer();
   capability.setBrowserName("iexplore");
   capability.setPlatform(org.openqa.selenium.Platform.WINDOWS);
   //capability.setVersion("");
  }

  driver = new RemoteWebDriver(new URL("http://localhost:4444/wd/hub"), capability);
  driver.navigate().to("http://google.com");

 }

 @Test
 public void test_first() throws InterruptedException{
  Thread.sleep(3000);
  WebElement search_editbox = driver.findElement(By.name("q"));
  WebElement search_button = driver.findElement(By.name("btnG"));
  search_editbox.clear();
  search_editbox.sendKeys("first");
  search_button.click();
 }

 @Test
 public void test_second(){
  WebElement search_editbox = driver.findElement(By.name("q"));
  WebElement search_button = driver.findElement(By.name("btnG"));
  search_editbox.clear();
  search_editbox.sendKeys("second");
  search_button.click();
 }

 @AfterClass
 public void tearDown(){
        driver.quit();
 }
}
GridWithWebdriver1.java/**
* @author Gaurang Shah
* To Demonstrate how to configure webdirver with Selenium Grid
*/
import java.net.MalformedURLException;
import java.net.URL;
import org.junit.AfterClass;
import org.openqa.selenium.*;
import org.openqa.selenium.remote.DesiredCapabilities;
import org.openqa.selenium.remote.RemoteWebDriver;
import org.testng.annotations.*;
public class GridWithWebdriver1 {
public WebDriver driver;
@Parameters({"browser"})
@BeforeClass
public void setup(String browser) throws MalformedURLException, InterruptedException {
DesiredCapabilities capability=null;
if(browser.equalsIgnoreCase("firefox")){
System.out.println("firefox");
capability= DesiredCapabilities.firefox();
capability.setBrowserName("firefox");
capability.setPlatform(org.openqa.selenium.Platform.ANY);
//capability.setVersion("");
}
if(browser.equalsIgnoreCase("iexplore")){
System.out.println("iexplore");
capability= DesiredCapabilities.internetExplorer();
capability.setBrowserName("iexplore");
capability.setPlatform(org.openqa.selenium.Platform.WINDOWS);
//capability.setVersion("");
}
driver = new RemoteWebDriver(new URL("http://localhost:4444/wd/hub"), capability);
driver.navigate().to("http://google.com");
}
@Test
public void test_third() throws InterruptedException{
Thread.sleep(3000);
WebElement search_editbox = driver.findElement(By.name("q"));
WebElement search_button = driver.findElement(By.name("btnG"));
search_editbox.clear();
search_editbox.sendKeys("third");
search_button.click();
}
@Test
public void test_fourth(){
WebElement search_editbox = driver.findElement(By.name("q"));
WebElement search_button = driver.findElement(By.name("btnG"));
search_editbox.clear();
search_editbox.sendKeys("foruth");
search_button.click();
}
@AfterClass
public void tearDown(){
//Close the browser
// driver.quit();
}
}
Testng.xml
<suite name="Selenium Grid with webdriver" verbose="3"  parallel="classes" thread-count="2">
  <test name="Selenium Grid Demo">
  <parameter name="browser" value="iexplore"/>
    <classes>
      <class name="tests.GridWithWebdriver"/>
   <class name="tests.GridWithWebdriver1"/>
    </classes>
 </test>
 </suite>
Now in order to run using testng.xml we need to start the Grid hub and two remote control with Iexplore as browser.
Now to start the Grid and remote control open CMD and navigate to folder where Grid2 jar (selenium-server-standalone-x.x.x.jar) file is located and use the following commands
To start the Grid Hub
java -jar selenium-server-standalone-2.5.0.jar -role hubTo start the remote control supporting Internet explore
java -jar selenium-server-standalone-2.5.0.jar -role webdriver -hub http://localhost:4444/grid/register -browser browserName=iexplore,platform=WINDOWSTo start another the remote control supporting Internet explore
java -jar selenium-server-standalone-2.5.0.jar -role webdriver -hub http://localhost:4444/grid/register -browser browserName=iexplore,platform=WINDOWS -port 5556
After this open http://localhost:4444/grid/console in you browser. You should be able to see something like below image.

Now if you will run using testng.xml you will see two Internet explorer will open and one will execute test_first() and test_second() while another will execute test_third() and test_fourth() in parallel.
Run same testcases on different browser in parallel.
In this example we will execute GridWithWebdriver tests on Firefox and Internet Explorer in parallel.
To do so you need to modify you testng.xml as below.
Testng.xml
<suite name="Same TestCases on Different Browser" verbose="3"  parallel="tests" thread-count="2">
  <test name="Run on Internet Explorer">
 <parameter name="browser"  value="iexplore"/>
    <classes>
      <class name="Tests.GridWithWebdriver"/>
    </classes>
 </test>

  <test name="Run on Firefox">
 <parameter name="browser"  value="firefox"/>
    <classes>
      <class name="Tests.GridWithWebdriver"/>
    </classes>
 </test>
 </suite>
Now to run testcases we need to start grid hub and one remote control supporting Firefox and another supporting Internet Explorer. Now to start the Grid and remote control open CMD and navigate to folder where Grid2 jar (selenium-server-standalone-x.x.x.jar) file is located and use the following commands
To start the Grid Hub
java -jar selenium-server-standalone-2.5.0.jar -role hubTo start the remote control supporting Firefox
java -jar selenium-server-standalone-2.5.0.jar -role webdriver -hub http://localhost:4444/grid/register -browser browserName=firefox,platform=WINDOWSTo start another the remote control supporting Internet explore
java -jar selenium-server-standalone-2.5.0.jar -role webdriver -hub http://localhost:4444/grid/register -browser browserName=iexplore,platform=WINDOWS -port 5556After this open http://localhost:4444/grid/console in you browser. You should be able to see something like below image.

Now if you will run above test case one Firefox and one IE will launch and both test_first() and test_second() will execute in both browser simultaneously.