Friday, December 11, 2009

ANT with ReportNG, TestNG and Eclipse

After exploring the TestNG, I came to know about two more things that can help in Selenium Automation. One is ANT and another is TestNG. Let’s have a look what both of these are.
ReportNG
ANT
Download Demo Project
Run Demo Project

ReportNG
ReportNG is a plug-in for TestNG which generates nicer reports than TestNG. TestNG has some interfaces that allow you to modify the behavior of TestNG, they call it listeners. One of the listeners is for reporting and ReportNG has used these listeners to make the reports better.
You can check out the sample reports here.
Sample Report

ANT
Ant is an Apache java based build tool, just like make but better than that. It is used to automate your JAVA building process. You can use ANT to do so many tasks but these are few which would help in running TestNG test cases.
  • Start the selenium server
  • Compile the java files and Run it using TestNG
  • Overwrites the TestNG report with ReportNG plug-in
  • Open the Report in browser after completation of test.
Following is the ANT file, which will perform above all task.

Just change the paths of jar file to location on your machine.
<project name="ANT_with_ReportNG" default="run" basedir=".">

 <property name="classes.dir" value="bin" />
 <property name="src.dir" value="src" />
 <property name="report.dir" value="reports" />
 <property name="logs.dir" value="logs" />
 <property name="browser" value="C:/Program Files/Mozilla Firefox/firefox.exe"/>

 <path id="libs">
  <fileset dir="lib">
   <include name="*.jar"/>
  </fileset>
  <pathelement path="${basedir}\${classes.dir}"/>
 </path>

 <target name="run">
  <antcall target="startSeleniumServer"/>
  <antcall target="init"/>
  <antcall target="compile"/>
  <antcall target="runTests"/>
  <antcall target="stopSeleniumServer"/>
  <antcall target="openReport"/>
  </target>
 
 <!-- Start the server -->
 <target name="startSeleniumServer">
  <echo>Starting Selenium Server...</echo>
  <java jar="lib\selenium-server-1.0.2.jar" fork="true" spawn="true">
   <arg line="-singlewindow -log ${logs.dir}\selenium_server_log.txt"/>
  </java>
  
 </target>
 
 <target name="stopSeleniumServer">
  <echo> Trying to stop selenium server ... </echo>
  <get taskname="selenium-shutdown" src="http://localhost:4444/selenium-server/driver/?cmd=shutDownSeleniumServer"
   dest="${logs.dir}\selenium_server_shutdown_result.txt" ignoreerrors="true" />
  <echo taskname="selenium-shutdown" message="DGF Errors during shutdown are expected" />
 </target>
 
 <!-- Delete old data and create new directories -->
 <target name="init" >
  <echo>Initlizing...</echo>
  <delete dir="${classes.dir}" />
  <mkdir dir="${classes.dir}"/>
  <delete dir="${report.dir}" />
  <mkdir dir="${report.dir}"/>
  <mkdir dir="${logs.dir}"/>
 </target>

 <!-- Complies the java files -->
 <target name="compile">
  <echo>Compiling...</echo>
  <javac includeantruntime="false" debug="true" srcdir="${src.dir}" destdir="${classes.dir}"   classpathref="libs" />
 </target>

 <!-- Runs the file and generates Reportng report -->
 <target name="runTests" description="Running tests" >
  <echo>Running Tests...</echo>
  <taskdef resource="testngtasks" classpathref="libs"/>
  <testng outputDir="${report.dir}"
    haltonfailure="true"
    useDefaultListeners="false"
    listeners="org.uncommons.reportng.HTMLReporter"
    classpathref="libs">
   <classfileset dir="${classes.dir}" includes="**/*.class" />
  </testng>
 </target>

 <!-- Open the report in browser.-->
 <target name="openReport"> 
  <exec executable="${browser}" spawn="yes"> 
   <arg line="'${report.dir}\html\index.html'" /> 
  </exec>
 </target>
</project>


Download Demo project
you can download the demo project from the following location
Download

Run Demo Project.
You can run project in two waya. From command prompt and from IDE. 

To Run the project from the command prompt do following steps
But in order to run ant file from command prompt you need to have ANT on your machine and it's path in ur PATH variable. 
  • Open the command prompt and navigate to extracted folders. 
  • Now type the ant command

follow the given steps to run the project from eclipse IDE
  • Extract the ZIP file
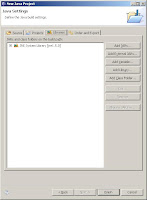
  • Open the Eclipse and navigate to file->New ->Java Project...
  • Choose "Create project from existing source" and browse to the extracted folder.
  • Now to run project open the Ant build.xml file and right click on it and choose Run as->Ant Build
Wednesday, November 18, 2009

Code Coverage with Cobertura.

Overview
How to use it for black box testing.
Problems I faced while using it in my project

Overview
Recently I came across the tool named cobertura when I was chatting with one of my friend. It is used to find out the percentage code covered by test cases. So I decided to have a look at this and to find out if I can use that in my project.

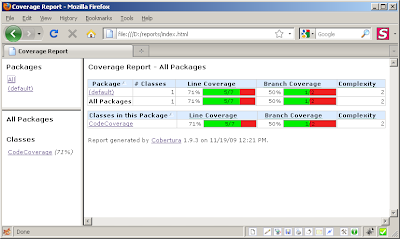
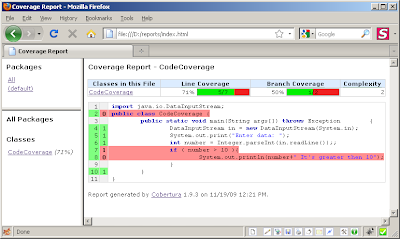
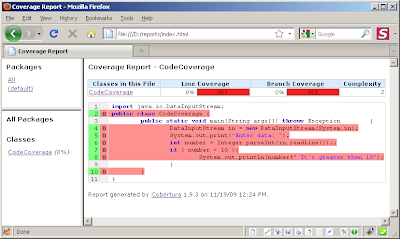
Cobertura is a free java based tool used to find out the code coverage in java based application. It shows you the percentage of line covered and percentage of branch covered for each class. It also shows you the line covered in source code by marking it red, if you have source code available.

It's the amazing tool for both black box and white box testing. From the report you can find out how much code has covered and can write down further test cases if you think the code coverage is not enough and if you have code you can exactly come to know which functionalities or which part of functionality requires further test cases. And based on the report you can come to know whether product/project has tested properly and take the decision whether to ship the product or not? So let us see how it’s being done by cobertura?

Cobertura generates the another class files (instrumented class files) from your original class files which help in finding out the code coverrage. You can simply replace this with your original class files or you can set the classpath such that java runs instrumented class files instead of normal class files. It also generates cobertura.ser file along with instrumented classes. Which saves the information about the line and branch covered per classes and used to generate the report.

How to use it for black box testing.
Now let's see one by one how to generate the report.
The coubertra already provides the example for how to use cobertura. But the example is with Junit and ANT so people who want to use it for black box testing and doesn't have much experience with ANT and Junit may find it bit complicated.
In the below example we will create a simple java file and then will find out the code coverage after executing some test cases.

1. Download the coberura depends on your OS and JDK version from the following location. The latest version of the cobertura requires JDK 1.5
http://sourceforge.net/projects/cobertura/files/cobertura/

2. Extract the file at your desired location.
3. Set the location of cobertura.jar file in your classpath.
4. Create three folders named Src, Instrumented, and Reports inside d:\ (or any other directory, just changed the path accordingly in following command )
5. Now Create a simple java file as below in d:\src folder
import java.io.DataInputStream;
public class CodeCoverage {
public static void main(String args[]) throws Exception {
DataInputStream in = new DataInputStream(System.in);
System.out.print("Enter data: ");
int number = Integer.parseInt(in.readLine());;
if ( number > 10 ){
System.out.println(number+" It's greater then 10");
}
}
}

6. Compile the file and generate the class file.
7. Now move to cobertura folder (folder where you have extracted the downloaded file) and to generate the instrumented classes give following command on command prompt.
cobertura-instrument.bat --datafile d:\instrumented\cobertura.ser --destination d:\instrumented d:\src

After executing this command instrumented class file would be generated in d:\instrumented folder. And cobertura.ser file will also be generated in the same directory.

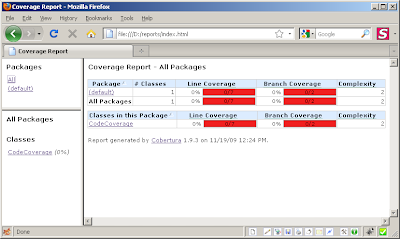
8. Now let's check the report before running the file. It should show 0% line coverage and 0% branch coverage as we haven't execute any of the test case. To generate the report run the following command on your command prompt.

cobertura-report.bat --datafile d:\instrumented\cobertura.ser --destination d:\reports d:\src


9. Now to see the report go to the d:\Reports and open the index.html file in any browser.
10. Now lets try to cover some code by executing the file. Move to instrumented folder and then run the file using following command on command prompt and give 9 as input when it asks for.

Java CodeCoverage

11. Now again generates the report same way as we generated before.


Problems I faced while using it in my project
Once I take the overview and find out how to use it for the black box testing. I decided to find out it for my current project.

If you have jar file or war file for the webapplication, it's quite easy as Cobertura directly generates corresponding instrumented jar or war files and you just need to replace it with original one. However, in our project we were using all class files scattered in different folders. So rather than checking whole application I decided to find out code coverage for part of the application first.

When tried to generate the instrumented class files it gave me following error.

Exception in thread "main" java.lang.UnsupportedClassVersionError: net/sourceforge/cobertura/instrument/Main


I got this error because I was using cobertura 1.9.3, which requires JDK 1.5 however; my project is older and uses JDK 1.3. Therefore, I then downloaded the older version of cobertura, cobertura 1.8 and problem get resolved. It successfully generated the instrumented classes and cobertura.ser file. I also checked out the report to make sure there isn't any error. I was happy to see it showed all the classed with 0% coverage.

Therefore, I finally replace the files inside my project directory with instrumented classes. I also copied the copbertura.jar file on project directory and set its path in classpath. However, I was not sure about where to put cobertura.ser file. Therefore, I decided to restart the webserver without putting it anywhere, because anyway it’s going to be generated. However, the weserver did not start, it hung. And when i check the logs I find out the following error.

Exception in thread "main" java.lang.NoClassDefFoundError: net/sourceforge/cobertura/coveragedata/HasBeenInstrumented

According to error webserver was not able to find the class file require to run instrumented classes. I was confused, as I have set the classpath proper.

However, after having a cup of tea, I finally figure out the root cause. Cobertura.jar file wasn't having the executable permission (Ahh, this happens when you are habituated using windows system). I change the permission and restart the web server with fingers crossed. And web server started successfully, I checked the reports and it was showing the coverage successfully. Finally I was revealed and happy.

Wednesday, September 23, 2009

Selenium IDE Parametrization

Parametrization isn't a big deal if you are using selenium RC, But there are people who uses only Selenium IDE for the automation. And they face the problem when they need to do the parametrizationof the test case. so let's see how to do parametrization in selenium IDE.

You just need to make a JavaScript file which contains all the parameters with their values. And then you can easily access this parameter through selenium IDE.let's see this thing by an example.

let's first make the JavaScript file .

searchKey = "selenium IDE Parameterization"

copy the above line into a file and save it as data.js

Now as we have created the data file. We need some way for selenium to identify this data.js file and access the variables inside it. So for that you need to import it as Selenium IDE Extenstion. let's see how to do it.
First open the selenium IDE.
navigate to options->options
Under the selenium IDE extension browse the data.js file.
Restart the selenium IDE.

Now selenium IDE is able to access the data.js file. So let's see how to do it.
Following is the code that will open the google browser and will search the for the keyword we have sepecied in the data.js file.

<!--
Purpose: To show Prameterization using Selenium IDE
Created by: Gaurang Shah
Email: gaurangnshah@gmail.com
-->
<?xml version="1.0" encoding="UTF-8"?>
<!DOCTYPE html PUBLIC "-//W3C//DTD XHTML 1.0 Strict//EN" "http://www.w3.org/TR/xhtml1/DTD/xhtml1-strict.dtd">
<html xmlns="http://www.w3.org/1999/xhtml" xml:lang="en" lang="en">
<head profile="http://selenium-ide.openqa.org/profiles/test-case">
<meta http-equiv="Content-Type" content="text/html; charset=UTF-8" />
<link rel="selenium.base" href="http://www.google.co.in/" />
<title>Parameterization_Example</title>
</head>
<body>
<table cellpadding="1" cellspacing="1" border="1">
<thead>
<tr><td rowspan="1" colspan="3">Parameterization_Example</td></tr>
</thead><tbody>
<tr>
<td>open</td>
<td>/</td>
<td></td>
</tr>
<tr>
<td>storeEval</td>
<td>searchKey</td>
<td>searchKey</td>
</tr>
<tr>
<td>type</td>
<td>q</td>
<td>${searchKey}</td>
</tr>
<tr>
<td>click</td>
<td>btnG</td>
<td></td>
</tr>

</tbody></table>
</body>
</html>

Monday, September 21, 2009

Selenium - Verify Element Properties

While doing the automation through selenium we also need to verify the tooltip of the image or it's path(location, URL). selenium has provided API to check the attirbutes of any element. Now let's see how to do this.

let's first see how to do this in selenium. The following script will navigate to http://qtp-help.blogspot.com. Then it will fetch the URL of the profile photo and will open the photo.

storeAttribute //img[@alt='My Photo']@src imagePath
open ${imagePath}


<!-- Purpose:- To show how to verfiy the Properties of a image
Created By:- Gaurang Shah
Email:- gauragnnshah@gmail.com
-->

<?xml version="1.0" encoding="UTF-8"?>
<!DOCTYPE html PUBLIC "-//W3C//DTD XHTML 1.0 Strict//EN" "http://www.w3.org/TR/xhtml1/DTD/xhtml1-strict.dtd">
<html xmlns="http://www.w3.org/1999/xhtml" xml:lang="en" lang="en">
<head profile="http://selenium-ide.openqa.org/profiles/test-case">
<meta http-equiv="Content-Type" content="text/html; charset=UTF-8" />
<link rel="selenium.base" href="http://qtp-help.blogspot.com/" />
<title>Verify Image Property</title>
</head>
<body>
<table cellpadding="1" cellspacing="1" border="1">
<thead>
<tr><td rowspan="1" colspan="3">New Test</td></tr>
</thead><tbody>
<tr>
<td>open</td>
<td>/</td>
<td></td>
</tr>
<tr>
<td>storeAttribute</td>
<td>//img[@alt='My Photo']@src</td>
<td>imagePath</td>
</tr>
<tr>
<td>open</td>
<td>${imagePath}</td>
<td></td>
</tr>
</tbody></table>
</body>
</html>

Friday, September 4, 2009

Selenium - Element not found


Why Element not found error Occurs ??
Solution.


Why Element not found error occurs ??
This is most simple but most occurred error. There can be only one of two things why this error appears
  1. Locator(ID, Name, XPath, DOM or CSS) you have given is wrong
  2. Element is not visible
Now there can be two reason why element is not visible
  1. Element is not present on that page, may be wrong page has opened or element has been removed. Or
  2. Element is not visible element has not been loaded yet (Page hasn't loaded fully)

Solution
Solution is also easy. First check manually if element is present on the page or not. If it is present try to wait until that element appears. If your element is not being loaded as a ajax call you can simple use following function, which will wait until page loads.
selenium.waitForPageToLoad("3000");
you can increase the time if page is taking more time to load.

But if your element is being loaded as a part of AJAX call, you can use the following function to wait until that element appears or timeout occurs.

The function will return true if element will be found on page within giving time else will return false.

/**
  * @author Gaurang
  * @param locator 
  * @param timeout (minutes)
  * @throws InterruptedException
  * @return returns true if element found in given time else false
  *  wait until specified element appears or timeout occurs
  */
 public boolean waitForElementPresent(String xpath, int timeout) throws InterruptedException{
  int count = 0;
  while(selenium.isElementPresent(xpath) != true){
   Thread.sleep(10*1000); //Wait 10 seconds
   if(count++ > timeout*6 ) break;
  }
  
  if(selenium.isElementPresent(xpath))
   return true;
  else
   return false;
    
 }

Monday, August 24, 2009

Selenium - Handling dialog box in MAC

What's the problem ?
How to Handle Dialog box in windows ?
How to handle Dialog box in MAC ?
Download the script ?
How to invoke the script/application. ?
Download the executable (app)

Selenium is a great tool to automate the web application. It supports you to test on multiple browser and on multiple Operating Systems. But it has few problems too. One if it's problem is it becomes blind when it comes to identify any of the dialog boxes. This is because dialog box are native components and selenium is designed to identify the web elements only (design bug, ahh just kidding)

How to Handle Dialog box in windows ?
You are bit lucky if you are using Windows Platform, coz then you can use Autoit to handle these dialog boxes. check this out the below link for
http://qtp-help.blogspot.com/2009/07/selenium-handle-dialogs.html

How to Handle Dialog box in MAC ??
But what if you are testing on mac? obviously you can't use AutoIt. But that doesn't mean you can't handle the dialog box on the mac. Mac provides better facility than windows in this case. You don't even need to download or install new software for this. Mac has the AppleScript which you can use to handle to dialog boxes.

Don't worry if you don't have much knowledge about AppleSctript, It's just like other scripting languages ( actually it's not, it will look bit weird if you have used Shell script or JavaScript before).

Before I found out that the applescript can solve the problem, and write down this piece of code I wasn't aware of the AppleScript, neither I have worked on the MAC in my life. So to write down this little piece of code took my whole 3 hours. But I am happy as it's working.

Following is the script to handle the Authentication dialog box of Firefox in mac.


(*
Created By: Gaurang Shah 
   gaurangnshah@gmail.com 
   
Purpose: To handle the Athentication dialog box in Firefox.
Usage: Filename UserName Password
*)

delay 10

on run argv
 tell application "Firefox"
  activate
 end tell
 
 
 tell application "System Events"
  if UI elements enabled then
   tell process "Firefox"
    set frontmost to true
   end tell
   
   if length of argv < 2 then
    display dialog "Usage: FileName UserName Password"
    return
   end if
   
   keystroke item 1 of argv
   keystroke tab
   keystroke item 2 of argv
   keystroke return
   
   
  else
   tell application "System Preferences"
    activate
    set current pane to pane "com.apple.preference.universalaccess"
    display dialog "UI element scripting is not enabled. Check \"Enable access for assistive devices\""
   end tell
  end if
 end tell
end run

Download the script

You can write down the similar script to handle other File Open and File Save Dialog boxes.

How to call the script
It's quite to easy to invoke the script.
Just open the script in Script Editor and save the script as application. In the Java File write down the following line just before the line that shows dialog box
dialog =  new String[]{ "Handle_Authentication_Dialog_FF.app","UserName","Password" };
//First String in the application name. Must be in your project folder. 
// Second is UserName to log in 
// Third is Password.
Runtime.getRuntime().exec(Dialog);

The other way is that you can open the Shell Prompt and pass the application name and it's arguments as follows. I am not sure this will work or not.
dialog =  new String[]{ "Shell prompt","Handle_Authentication_Dialog_FF.app","UserName","Password" };
//First String in the application name. Must be in your project folder. 
// Second is UserName to log in 
// Third is Password.
Runtime.getRuntime().exec(Dialog);

Monday, August 17, 2009

Free Test Management tools

Recently moved into another project and got the chance to evaluate test management tools. The requirement was simple.
1. It must be free. (it was an internal project and so we can't spend money) better if it's open source in this case we can change or add the things.
2. Easy to use.
3. Should provide the facility to connect to mantis or Bugzilla BTS.

So I started searching on the forum and Google for the free Test Management Tools and end up with plenty of that. It's nice to have plenty of options to choose from, but not when you are running out of time. I have got only a week to do this, with too much work in the another project. So I simple gone through the features they provides, and based on that I picked some six tools to evaluate.

After deciding which tools to evaluate, I started downloading, installing and configuring them to see what they offers. After evaluating most of the tools and ran out of time I finally decided to evaluate only two tools further.

Following is my experience with tools.

From the 6 test management tools I picked, two are client-server application and other four are web based application, Which are developed in PHP and uses MySQL as database.

Client-Server
1. XStudio: It's quite a good client-server Test Management tool with XStudio as server and XAgent as client.
It provides you to write down Test Plan, Requirements, Test Suites and Test cases. It also provides the requirement coverage matrix. The installation and configuration is easy is easy.
But the problem was that it was crashing too frequently on my machine, so didn't able to evaluate in detail.

2. Salome: It's yet another client-server Test Management Tool made in JAVA and uses MYSQL as database. provides all the facilities of normal test management tool.
The only problem I face is that it's performance was sluggish on my machine, and it did hang couple of times, might be coz mine is not a server.

I drop down the whole idea of using client-server Test Management tool. Primarily because both the software I installed seemed to be unreliable. The other problem with client-server is every time you adds a user you need to install the client application on his machine. This is quite a nice thing from security point of view but we didn't want any of the installation headache.
So finally I decided to move with web based projects only.

Web Based:
Following are some of really nice web based test management tools which have been developed in the PHP and uses MYSQL as database.

2. QaTraq: This pops out as free tool in my search, but when I visited the site I became suspicious about the free and open source thing.
So I search further on site and find out that it's not free. the project was initially started as open source project, but as they didn't get any help from the community they changed it to paid one.
They still have an open source version available on sourceforge.net but the problem is that, it's about an year old. there isn't any active community to solve your bugs or to add features, So it's bit risky to use it.

The online demo of the paid version is available on request. you can check that out. But i drop the idea of using this one as we didn't want to spend a penny on the software.

4. RTH: It's known as Requirements and Testing Hub. It provides the features to create Test Plan, requirements, test cases. to store test result per release. It also has it's own BTS (bug tracking system). Provides the requirement coverage matrix too.
What I really like about the tool is it provides the facility to import and export test cases from excel file.
What I don't like about it is, It doesn't provide the facility to connect to mantis or Bugzilla BTS and it's bit complex to use.
It has a good facility for user role management but doesn't have facility to assign work to some user.

one of the nicest thing about the RTH is that it has online demo available. So to evaluate the tool you don't need to waste you time in downloading, installing and configuring it.
The online demo is available on following site
site:http://rth.liedl.at/login.php
User Name:admin
Password:password

1. Testlink: From all the tools I evaluate this is one is simplest to Install, Configure and Use.
Provides all the features, creating and storing test plan, requirements, Test sets, Test cases, Test results, Requirement coverage matix and much more.
What I really like about the tool is, It provides you to connect to mantis or Bugzilla.
It also allows you to import and export test cases, requirements and other things from Excel,XML,CSV. Which is quite a nice thing, I mean if you have already write down the requirements, and test cases in excel file, rather then doing a copy and paste simple import will solve your problems.

Testlink also provides the online demo. So you can check that out to evaluate.
Site: http://testlink.org/demo/login.php?note=expired

3. qaManager: Actually didn't get the time to evaluate this one. But it seems promising too.

After evaluating all the tools we finally decided to use TestLink, as it is simple to use and provides import export from excel file and also connects to mantis or Bugzilla.

The only problem we have is (or we might have), the stable version is 1.7.3 while we have choose to use 1.8.3 as 1.7.3 doesn't allow to directly import things from excel file.

Thursday, July 9, 2009

Selenium - Handle Dialogs

According to me Selenium is one of the best open source, free tool for testing web applications. It's quite powerful and gives you the facility to write down your test case in your favorite language ( from the plenty of languages it supports ). But it sucks when it comes to handle the dialogs. Dialog boxes are like ghosts to selenium, It can't even see them.
That's because dialogs are native to the operating system you are running and selenium are designed to identify only web component.

After searching too much on the Internet and other forums, I finally got the solution to all my problems. The solution is too simple. As you can't handle the dialog box through selenium, use the other software to do this. And AutoIT is best at this.

Download Execuable (exe) to Handle Save Dialog of Firefox
Download Execuable (exe) to Handle Save Dialog of Internet Explorer
Download Execuable (exe) to Handle Authentication Dialog


AutoIt
Autoit is a free scripting language designed to automate the windows component. It's just like an extensive VB Script and it allows you to convert the script in executable (exe). So what you can do is, write down the script to handle dialog box using AutoIt, convert it into executable and then call the executable when required. So let's see guys how to do it. But before we begin you need to download and install the Autoit. Download it from the following link
Download AutoIt


Handing Modal Dialogs
Modal Dialog box mean once it has appeared all the focus of that application will be on that dialog box only. You will not able to access any of the other component of parent window until you close the dialog box.

Some of the modal dialog boxes that we face frequently during web application testing are

Save Dialog Box
Save dialog box is bit different in IE and in Firefox. So I have write down two separate script for that.

AutoIt script to handle Firefox Save Dialog box
In Firefox when you click on the button/link to download a file. First it will ask you for you permission once you select yes, If you have selected to ask you for the path then only a dialog box will display.

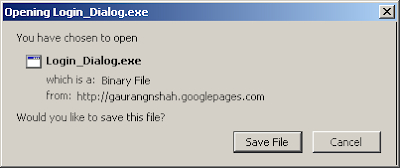
If you will click on download link following dialogbox will appear in Firfox.
Save Dialog box in Firefox

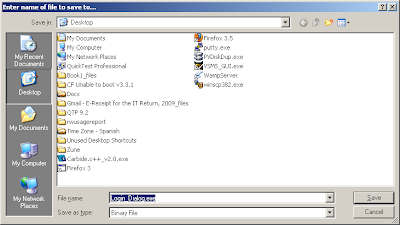
If you click "Save File" on above dialogbox this dialog box will apppears, Yeah if you have choose to ask where to save file from Option.
If you click save on above dialogbox this will appear.
The executable and the script below will handle both of these dialogboxes. You just need to call it in proper way. Your need to pass arguments while calling the script or executable as following.
Save_Dialog_FF Operation FilePath
Operaion: Operation you want to perform when dialog box appears. Can be any of the following
cancel: Press Cancel on the dialog box
Save: Press the Save as Dialog box
FilePath: It's an option argument. It's a full path where you want to save the file.
i.e. C:\myfile.txt
;---------------------------------------------------------
;~ Save_Dialog_FF.au3
;~ Purpose: To handle the Dowload/save Dialogbox in Firefox
;~ Usage: Save_Dialog_FF.exe "Dialog Title" "Opetaion" "Path"
;~ Create By: Gaurang Shah
;~ Email: gaurangnshah@gmail.com
;----------------------------------------------------------

; set the select mode to select using substring
AutoItSetOption("WinTitleMatchMode","2")
 
if $CmdLine[0] < 2 then
 ; Arguments are not enough
 msgbox(0,"Error","Supply all the Arguments, Dialog title,Save/Cancel and Path to save(optional)")
 Exit
EndIf

; wait until dialog box appears
WinWait($CmdLine[1]) ; match the window with substring
$title = WinGetTitle($CmdLine[1]) ; retrives whole window title
WinActive($title);

; if user choose to save file
If (StringCompare($CmdLine[2],"Save",0) = 0) Then

 WinActivate($title)
 WinWaitActive($title)
 Sleep(1)

 ; If firefox is set the save the file on some specific location without asking user.
 ;Save the File
 send("{TAB}")
 Send("{ENTER}")
 if ( StringCompare(WinGetTitle("[active]"),$title,0) = 0 ) Then
  WinActivate($title)
  send("{TAB}")
  Send("{ENTER}")
 EndIf

 ;if firefox is set to prompt user for save path.
 if WinExists("Enter name") Then
  $title = WinGetTitle("Enter name")
  if($CmdLine[0] = 2) Then
  ; If user hasn't provided path to save
  ;save to default path.
  WinActivate($title)
  ControlClick($title,"","Button2")

  Else
  ; If user has provided path 
  ;Set path and save file
  WinActivate($title)
  WinWaitActive($title)
  ControlSetText($title,"","Edit1",$CmdLine[3])
  ControlClick($title,"","Button2")
  EndIf

 Else
  ;Firefox is configured to save file at specific location
  Exit
 EndIf

EndIf
; do not save the file
If (StringCompare($CmdLine[2],"Cancel",0) = 0) Then
 WinWaitActive($title)
 Send("{ESCAPE}")
EndIf

Download above script

AutoIt script to handle Internet Explorer Save Dialog box
Unlike Firefox dialog box internet explorers dialog box is bit different. First dialog box prompts with three choices Run, Save and cancel. The second dialog box is same as Firefox. If you click on the download link in the internet explorer following dialog box will display. Selenium-Handle Save Dialog box of Internet ExplorereIf you will click on "Save" button on the above dialog box Following dialog box will appear which will ask for the path to save the file. Selenium-Handle Save Dialog box of Internet Explorere The executable and the script below will handle both of these dialog boxes. You just need to call it in proper way. Your need to pass arguments while calling the script or executable as following. Save_Dialog_IE Operation FilePath Operaion: Operation you want to perform when dialog box appears. Can be any of the following Run: Clicks on the Run button. cancel: Press Cancel on the dialog box Save: Press the Save as Dialog box FilePath: It's an option argument. It's a full path where you want to save the file. i.e. C:\myfile.txt
;--------------------------------------------------------------------
;~ Save_Dialog_IE.au3
;~ Purpose: To handle the Dowload/save Dialogbox in Internet Explorer
;~ Usage: Save_Dialog_IE.exe "Dialog Title" "Opetaion" "Path"
;~ Create By: Gaurang Shah
;~ Email: gaurangnshah@gmail.com
;--------------------------------------------------------------------

AutoItSetOption("WinTitleMatchMode","2") ; set the select mode to select using substring

if $CmdLine[0] < 2 then
; Arguments are not enough
msgbox(0,"Error","Supply all the arguments, Dialog title,Run/Save/Cancel and Path to save(optional)")
Exit
EndIf

; wait Until dialog box appears
WinWait($CmdLine[1]) ; match the window with substring
$title = WinGetTitle($CmdLine[1]) ; retrives whole window title
WinActivate($title)

If (StringCompare($CmdLine[2],"Run",0) = 0) Then
WinActivate($title)
ControlClick($title,"","Button1")
EndIf

If (StringCompare($CmdLine[2],"Save",0) = 0) Then

WinWaitActive($title)
ControlClick($title,"","Button2")
; Wait for the new dialogbox to open
Sleep(2)
WinWait("Save")
$title = WinGetTitle("Save")
;$title = WinGetTitle("[active]")
if($CmdLine[0] = 2) Then
;click on the save button
WinWaitActive($title)
ControlClick($title,"","Button2")
Else
;Set path and save file
WinWaitActive($title)
ControlSetText($title,"","Edit1",$CmdLine[3])
ControlClick($title,"","Button2")
EndIf

EndIf

If (StringCompare($CmdLine[2],"Cancel",0) = 0) Then
WinWaitActive($title)
ControlClick($title,"","Button3")
EndIf
Download above script

Now you just need to copy and paste above scripts in Autoit IDE, convert those into executables, Save those to the project folder. And then just make a call to the executables with proper arguments, just before you execute the step which invokes the dialog box as shows here.
/**
 * @author Gaurang Shah
 * Purpose: Shows how to invoke Executable to handle dialog box
 * Email: gaurangnshah@gmail.com
 */

import org.testng.annotations.*;
import com.thoughtworks.selenium.DefaultSelenium;
import com.thoughtworks.selenium.Selenium;

public class Handle_Dialogs {
private Selenium selenium;

 @BeforeClass
 public void startSelenium() {
  selenium = new DefaultSelenium("localhost", 4444, "*chrome", "http://www.autoitscript.com/");
  selenium.start();
 }
 
 @AfterClass(alwaysRun=true)
 public void stopSelenium() {
  this.selenium.stop();
 }
 
 
 @Test
 public void handleSaveDialog() throws Exception {
  String[] dialog;
  
  selenium.open("/site/autoit/downloads/");
  selenium.waitForPageToLoad("3000");
  selenium.click("//img[@alt='Download AutoIt']");
    
  Thread.sleep(2000);
  String browser = selenium.getEval("navigator.userAgent");
  if(browser.contains("IE")){
   System.out.print("Browser= IE "+browser);
   dialog =  new String[]{ "Save_Dialog_IE.exe","Download","Save" };
   Runtime.getRuntime().exec(dialog);
  }
  if(browser.contains("Firefox")){
   System.out.print("Browser= Firefox "+browser);
   dialog = new String[] { "Save_Dialog_FF.exe","Opening","save" };
   Runtime.getRuntime().exec(dialog);
  }
 }

}

Download above File

User Name and Password Dialog Box.

following is the AutoIt script to handle to User name and password dialog box.
;~ ------------------------------------------------------------
;~ Save_Dialog_IE.au3
;~ To handle the Authentication Dialogbox
;~ Create By: Gaurang Shah
;~ Usage: Login_dialog.au3 "Dialog Title" "User Name" "Password"
;~ ------------------------------------------------------------
AutoItSetOption("WinTitleMatchMode","2")

if $CmdLine[0] < 3 then
msgbox(0,"Error","Supply all the Arguments, Dialog title User Name, Password")
Exit
EndIf

WinWait($CmdLine[1]) ; match the window with substring
$title = WinGetTitle($CmdLine[1]) ; retrives whole window title
ControlSend($title,"","Edit2",$CmdLine[2]);Sets User Name
ControlSend($title,"","Edit3",$CmdLine[3]);Sets Password
ControlClick($title,"","OK");
Download above script

Tuesday, July 7, 2009

Selenium - Handling Windows

If your application has a link or a button which opens a new window, and you want to perform some action on the newly opened window though selenium, it's not that hard to handle if you have title, name or the variable associated with that window.

However this is not the case always, sometime you don’t have name of the window or any variable associated with it, and you are not even able able to identify window using title, at the time selenium sucks to identify the window. However there are some alternative ways to resolve this (which might work, not sure). But before we see that let’s see how to select the windows that can be identified easily.

Select window using SelectWindow API

When SelectWindow API fails to Identify Window

Select window using SelectWindow API
Selenium provides the selectWindow API which takes any of the following argument to identify the window.
Title: Use whatever appears on title bar of the window you want to select as argument to selct window API.
However be careful while using title to select the window. Because it may happen that multiple windows have same titles.And in this case Selenium just says that it will choose one, but doesn't mention which one. If this is the case where both have same title I would suggest not to use the title for selecting window. And sometimes the titles of windows are dynamic, and that may create some extra noise.

Name: You can use windows name to identify the window.
For example if the code to open a new window is like as below.

window.open("http://google.co.in","Google Window");

(The second parameter here is windows name. Developer uses this to identify the window in order to use that in further part of the coding.)

You can use "Google Window" as the argument to selectWindow, to select the window as shown below if the code to open the window is as shown above.

selenium.selectWindow("Google Window"); // select new window
//Do whatever you want to do on new window
Selenium.close(); //Close the newly opened window
selenium.selectWindow(null); //To choose the original window back.

Variable name: If opened window is assigned to some variable you can use that variable to identify and select that window.

For example if the code to open a new window is like as below.

GoogleWindow = window.open("http://google.co.in");

You can use "GoogleWindow" as argument to SelectWindow API, to select the window as shown in the code.

selenium.waitForPopUp("GoogleWindow", "30000");
selenium.selectWindow("GoogleWindow");
//Execute steps on new window
selenium.close(); //close the new window
selenium.selectWindow("null"); // select original window.

Using inbuilt API to retrieve Windows Names, Titles and IDs
Selenium provides some APIs to find out the names, Titles and IDs of the all opened windows. So you can use this APIs with SelectWindow API to select the window.

getAllWindowNames() – this will return you the array of all the opened windows names.
getAllWindowTitles() - this will return you the array of all the opened windows names.
getAllWindowIDs() - this will return you the array of all the opened windows names.

So if you have opened only single window you can use something like this to select the newly opened window.

selenium.selectWindow(getAllWindowNames()[1]);
OR
selenium.selectWindow(getAllWindowTitles()[1]);
OR
selenium.selectWindow(getAllWindowIDs ()[1]);

When SelectWindow API fails to Identify Window
Sometimes it happens that you use all the things to select the window but it fails to identify the windows. At the time you can use one of the following ways

Check the selenium logs.
The document of the selectWindow API says that if selenium is not able to identify the window after using all the things mention above you should check out for the window name in selenium log. To do that just start your selenium server with –log argument, something like following:

Java – jar path of selenium-server.jar –log log.txt

Write down the test case to open the window and execute it. Now shutdown the selenium server and checkout the logs for something like this.

Debug: window.open call intercepted; window ID
If you find this you can use this window ID to identify and select the window as the argument to selectWindow API.


Selecting the Window Using openWindow API
Sometimes selenium is not able to identify the window, one of the case is when the window is opened through onload event. Something likes this

<body onload='window.open("http://google.co.in");'>

In this case you can force selenium to identify the window using openwindow command, with URL as blank and name as you like.

Selenium.openWindow("","MyWindow");
selenium.selectWindow("MyWindow");

But if your window is not opening through onload event, and though selenium is not able to select the window after doing all the above things. The only thing left is to open the window using openwindow API with URL same as it would be if would have been opend through button or link click and name as you like. Something like as below.

Selenium.openWindow("http://google.co.in","MyWindow");
Selenium.selectWindow("MyWindow");

Thursday, July 2, 2009

My Firefox add-on.

Download
How to Create Firefox add-on

I just created my own Firefox add-on and submitted to the Firefox. I was free couple of weeks ago and was getting bored, so thought of doing something. And finally I came up with idea of creating my own Firefox add-on. But there was a problem, I wasn't aware of how to make Firefox add-on. So I did some googling on it and came up with some great links(Thanks to the larry and Sergey). It didn't took more than couple of hours to understand how to make the Firefox add-on. Firefox has made it damn easy ( and if you have any doubt about that, just try to make one for IE).

I was thinking that hard part will be to the add-on, but it revealed to be easy. However I found my self stuck with other question, what to make that is useful, easy to implement (as it's my first add-on) and not already been implemented ? Because everything you think of is almost implemented.

But after doing some brainstorming I finally got the idea, I decided to make Spell Checker (Firefox add-on), which checks the spelling mistakes on the page, and not in edit box. The idea came up from my own experience ( and of other friends) of testing websites. Usually we require to test the website for spelling mistakes too. If the site is live I prefer to use some sites (online services) which provides the facility to find the spelling mistakes from page you have submitted. But most of the time the site we require to test are not live, so we can't use other web service for that. And for that we need to use MS Word (or similar software) . It requires to navigate to each page, copy whole text, paste it in the MS Word and then separates the spelling mistakes. And that's a tedious and time consuming task to do. And so I think a add-on, for such thing will be helpful to me ( and yeah others too.. ).

So I quickly learn some JavaScript, put couple of question regarding the JavaScript and add-on on the forum and finally I made my first running version of Firefox add-on, and submitted to the Firefox. Even though it was having plenty of errors and as tester I wouldn't have release it, But somehow my inner developer, woke up and told me to submit just to see other users reacting.

okay so I made it, I submitted it, and other people will be able to download it, use it, but hang on that's not all. Firefox has a system that when you first submits a add-on, Firefox keeps it in the sandbox (a area where people can download add-on, but with warning).

So next step was to make it public. (so that creepy warning disappears) . But you require to have at least three reviews to make it. That seemed to be easy, but it's not because only people who has account can do that.

After few days I nominated it for the public nomination. But after a long delay of 60 (approximately) days I got the email from Firefox which told me that they can't make it public as I haven't handle the global variable in the add-on and it may create problems to other add-on. It didn't fell good, It can't. But the good thing was that they have suggested me some links to resolve the problem.

So I navigate to the link and do some Googleing on global variables and namespace in JavaScript. And I did find out that global variables are really evil thing.

So after a while I resolved the problem of global variable and submitted the new version of my Firefox add-on with fingers crossed that this time it will become the public.


Download Spell Checker

You can download my add-on form the following page.
https://addons.mozilla.org/en-US/firefox/addon/11259

How to Create Firefox add-on
If you want to learn how to create a Firefox add-on following are couple of resource that might help you.

http://www.rietta.com/firefox/Tutorial/prefs.html
https://developer.mozilla.org/en/Building_an_Extension
https://developer.mozilla.org/en/XUL_Overlays
https://developer.mozilla.org/en/XUL_Reference

Wednesday, May 13, 2009

TestNG with Eclipse

After exploring both JUnit and TestNG, I finally decided to go with the TestNG. And I moved on to eclipse IDE aswell, as it will provide ease in writing and running the testcases ( as compared to the dos prompt and notepad). The following blog will show you how to install TestNG plug-in in eclipse and how to create and run testcase.
Install TestNg on Eclipse
Create Testcase
Run the Testcase


Installing TestNG on Eclipse
follow the simple steps below to install the TestNG plug-in on the eclipse IDE.
  • Open the Install/Update window from Help->Software Updates->Find and Install
  • Click on the radio button "Search for new feature to install" and click "Next" button
  • Click on the "New remote site..." and supply name as "TestNG" and URL as "http://beust.com/eclipse" and click on "OK"
  • Make sure the TestNG is checked and click on the "Finish" Button
  • Now follow the other steps and TestNG will be installed.


Create TestCase
To create the testcase in the eclipse you also need to create a project and import some require JAR files. So let's being with that.
  • Create the project
    Now to begin with the the eclipse you need to first create the project. it will contain all the packages and packages will contain all necessary Java files (testcases ) and configuration files ( xml files )
    So just navigate to the file->new->Java Project. Give it some appropriate name and create it.
  • Import required JAR files
    Now to support the testNG framework and selenium API you need to import their jar files.
    So just click on the Libraries tab and then click on the "Add External Jars.." import the following libraries from you hard disk.
    selenium-java-client-driver.jar
    selenium-server.jar
    testng-5.9-jdk15.jar

    If you have already created the project. Just open the project properties dialog box from Project->Properties.
    Now click on the "Java Build Path" and then click on the "Libraries" tab and import all the libraries mentioned above.

  • Write testcase.
    Now we need to create a new class file and need to write down the testcase. Just Right click on your project and click on the new->Class. Provide the name as google in the dialog box.
    Now just replace the code the Google.java file with the below code.
Google.java
import static org.testng.AssertJUnit.*;
import org.testng.annotations.*;
import com.thoughtworks.selenium.*;

public class Google {
private Selenium selenium;

@BeforeClass
public void startSelenium() {
selenium = new DefaultSelenium("localhost", 4444, "*chrome", "http://www.google.com");
selenium.start();
selenium.open("http://www.google.com");
}

@AfterClass(alwaysRun=true)
public void stopSelenium() {
this.selenium.stop();
}

@Test(groups="search")
public void googling() {
try {
selenium.type("name=q", "qtp-help.blogspot.com");
selenium.click("name=btnG");
selenium.waitForPageToLoad("60000");
assertTrue(selenium.isTextPresent("qtp-help.blogspot.com"));

} catch (SeleniumException e) {
fail(e.getMessage());
}
}
}


Run the Testcases.
Now you have created the testcases. But before we run it. Let's start the selenium server.
Now to run the testcase right click on the project and then click on the Run As->Open Run Dialog box
Now right click on the TestNg in the left pannel and click "New". Now you need to create a run configuration based on how you would like to run you testcases(s).

Here you will find five option to run your testcases(s). Let's see one by one what all these options are.
First browse your project by clicking on the browse button.

Class: If you will select this, all the testcases under the selected class will run on b y one.

Method: Choose this option if you want only particular testcase to run.


Group: This option will allows you to run the Groups of the testcases if you have mention that in your class. You can browse all the Groups in the class and can choose particular group to run.


For All the above option a temporary config will be created in you project folder.
Package:Choose this option if you want to run all the classes inside a package.
Suite: Use this option if you want to run any of the testsuit from your class. However to use this you need to create the TestNG configuration file.

Tuesday, May 5, 2009

TestNG

TestNG is yet an another framework to work in JAVA. Both looks almost same on the surface but there are vast differences between their frameworks. JUnit is designed to do the unit testing, and it's doing it very well while the TestNG has designed to do the higher level thing. So there are many features available in the TestNG that you will not find in JUnit.

Before we checkout the features provided by the TestNG, let's take a look at how to make the simple testcase using TestNG and run it.


TestNG Annotations
Following are some of the annotations we have used in our example
@BeforeClass: The annotated method will be run before the first test method in the current class is invoked.
@AfterClass: The annotated method will be run after all the test methods in the current class have been run.
@Parameters: Describes how to pass parameters to a @Test method.
@Test: Marks a class or a method as part of the test.

If you look at the @BeforeClass and @AfterClass annotation they are same as of JUnit, the only difference is the method annoted with @BeforeClass or @AfterClass need not to be static as compared to the JUnit.

TestNG Testcase

Google.java

import static org.testng.AssertJUnit.*;
import org.testng.annotations.*;
import com.thoughtworks.selenium.*;

public class Google {

private Selenium selenium;

@BeforeClass
@Parameters({"selenium.host","selenium.port","selenium.browser","selenium.url"})
public void startSelenium(String host, String port, String browser, String url) {

this.selenium = new DefaultSelenium(host, Integer.parseInt(port), browser, url);
this.selenium.start();
this.selenium.open(url);
}

@AfterClass(alwaysRun=true)
public void stopSelenium() {
this.selenium.stop();
}

@Test
@Parameters({"search","expected"})
public void googling(String search, String expected) {
try {
selenium.type("name=q", search);
selenium.click("name=btnG");
selenium.waitForPageToLoad("60000");
assertTrue(selenium.isTextPresent(expected));

} catch (SeleniumException e) {
fail(e.getMessage());
}
}
}


Configuration file.
Configuration file is a normal xml file. which defines all the test cases, test suits, their names,all the parameters and their values and many more things.

Let's look at configuraion file for the above testcase
GoogleTestng.xml


Set CLASSPATH
Before you run your testcase from the command line, You need to set the classpath.
Find out the file "testng-5.9-jdk15.jar" and set it's path in classpath variable.
The name of the file may differ depending upon the version of TestNG you are using.
To set the class path do as follows:
1. just right click on My Computer icon, Click on the Advance tab, then click on the Environment Button.
2. In the System Variable double click on the CLASSPATH.
3. In the variable value add the full path of your "testng-5.9-jdk15.jar" file.
Run the Testcase.
  • Make sure that the Selenium server is running.
  • Save the above Google.java file at your desired location
  • Compile the file using the following command on the shell prompt.
    javac Google.java
  • Run the file using the following command on the shell prompt.
    java org.testng.TestNG GoogleTestng.xml
  • Use the following command to see the result.
    start test-output\index.html

Once you will run the testcase on more interesting thing you will find about the TestNG, the reporting. TestNg has built in primary reporting facility which will let you know how many test cases from the particular test suit has run, how many of then passed and how many of them failed.

Monday, May 4, 2009

JUnit Parameterization

Now say you need to run the same test case for the multiple values. you can do this with the help of the parametrization.

JUnit 4 has changed the whole way you do the parametrization. it has introduced a special runner called Parameterized. It allows you to run the same test(s) with different datasets.

Now let's go step by step to make the test case parametrized ( data driven )
Use Parameterized Runner.
If you wanted to make any test case parameterized ( Data Driven ) you need to make it's whole class to run using Parameterized Runner.
This will be done with the help of the @RunWith annotation. Just add the following line before the class.
@RunWith(value=Parameterized.class)

Make Dataset
Now you need to have dataset with all input values and expected output values. Here I have used two dimension array with one column as (input) value and other column as expected (output).
Now every testcase ( method with annotation @Test) will run as many times as the number of rows in the dataset (array).

Now let's move to the example
Example
The example below will do the following task
1. Navigate to the Google.co.in Site.
2. For all the available dataset it will verify the factorial using google calculator.

import com.thoughtworks.selenium.*;

import static org.junit.Assert.assertEquals;
import static org.junit.Assert.assertTrue;

import org.junit.runner.RunWith;
import org.junit.runners.Parameterized;
import org.junit.runners.Parameterized.Parameters;
import org.junit.*;

import java.util.regex.Pattern;
//require for the collection class
import java.util.*;

@RunWith(value=Parameterized.class)
public class parameterization {

private static DefaultSelenium selenium;
private long expected;
private int value;

@BeforeClass
public static void init() /* throws Exception */ {
selenium = new DefaultSelenium("localhost", 4444, "*chrome","http://google.com");
selenium.start();
}

@Parameters
public static Collection data() {
return Arrays.asList( new Object[][] {
{ 1, 0 }, // expected, value
{ 1, 1 },
{ 2, 2 },
{ 24, 4 },
{ 5041, 7 },//wrong expected
});
}

public parameterization(long expected, int value) {
this.expected = expected;
this.value = value;
}
@Test
public void firstTest() throws Exception {

selenium.open("/");
selenium.type("q", value+"!=");
selenium.click("btnG");
selenium.waitForPageToLoad("30000");

String text = selenium.getText("//div[@id='res']/table[1]/tbody/tr[1]/td[3]/h2/b");
//to remove whitespaces
text= text.replace(" ","");
// will verify the text
assertEquals(value+"!="+expected,text);

}
}
If you will look at the above example you will find out that the init() method which is used to open the firefox browser and to navigate to google.co.in site has marked annotation @BeforeClass rather then @Before.
This is because we need site to be opened for all the testcases.

The array which we have used is static. This is because we want it to be same for all the testcase. If it will not be static a new array will be created for the number of nows in the column. and so every test will get the same value, first row.

The another things is when you will run the last test case will show as fail. This is because we have put its expected value in the dataset as 5041 which is wrong. This is just to verify that the assert statement is working correctly.

Saturday, May 2, 2009

Junit 4

Recently I was learning selenium with JUnit. I had bit prior experience with the JUnit 3 so it didn't take much time to setup and run the test case. But then After I decided to take a look at the JUnit 4. And believe me guys it is far better then it's ancestors.So let's go step by step with Junit4.

What's new in JUnitt4 ?

JUnit Annotations

Editing test case

Running test case


So what's new in the JUnit 4 ??
JUnit 4 has introduced the annotation which is supported by JAVA 5, same as TestNG. And that has added much of the flexibility in writing the test cases.

Now you do not need to:
  • Write down the test cases name as starting with test.
  • Extend you test case
  • Have setUp() or tearDown() methods
  • add any main or suit() methods in the test case.

JUnit Annotations:
take a look at some of the frequently used JUnit annotations while writing test cases.

  • @Test: Marks the method as the test case.
  • @Before: Marks the method to execute before each and every test case. Same as setUP()
  • @After : Marks the method to execute after each and every test case. Same as tearDown()
  • @BeforeCalass: Marks the method to execute before all the test cases. Used to do the initilization which is command for all the test cases.
  • @AfterClass: Marks the method to execute after all the test cases executed. Used to do the system wide cleanup.


The thing to take care here is, If a method has annotation @BeforeClass or @AfterClass it has to be static. And that means all the variable inside that also has to be static.

Converting Selenium test case to JUnit 4.

Take a look at the following code, which has been recorded through selenium and exported in java.
package com.example.tests;

import com.thoughtworks.selenium.*;
import java.util.regex.Pattern;

public class NewTest extends SeleneseTestCase {
public void setUp() throws Exception {
setUp("http://www.google.com/", "*chrome");
}
public void testNew() throws Exception {
selenium.open("/");
selenium.type("q", "selenium IDE");
selenium.click("btnG");
selenium.waitForPageToLoad("30000");
selenium.click("link=Selenium IDE");
selenium.waitForPageToLoad("30000");
}
}

Now to convert this into the JUnit 4 testcase you need to perform the following things
  • Remove first line starting with Package or comment it.
  • add the following import statement
    import org.junit.*;
  • Remove the setUp() method.
  • Do no extend the class, Remove the "extends SeleneseTestCase" string
  • Now you need to create the object of the DefaultSelenium class as we have removed the extend statement and setUp() method. Add the following code in you class for that.

    private DefaultSelenium selenium;
    @Before
    Public void init() throws Exception {
    selenium = new DefaultSelenium("localhost", 4444, "*chrome","http://google.com");
    selenium.start();
    }

The Exported code will look like as below after editing it.
import com.thoughtworks.selenium.*;
import java.util.regex.Pattern;
import org.junit.*;

public class GoogleSearch {

private DefaultSelenium selenium;

@Before
public void init() throws Exception {
selenium = new DefaultSelenium("localhost", 4444, "*chrome","http://google.com");
selenium.start();
}

@Test
public void firstTest() throws Exception {

selenium.open("/");
selenium.type("q", "selenium IDE");
selenium.click("btnG");
selenium.waitForPageToLoad("30000");
selenium.click("link=Selenium IDE");
selenium.waitForPageToLoad("30000");
}
}
  • Make sure the file name and the class name is same.
  • Save the file and compile it with following code.

    javac path/filename.java

    If everything goes fine up to the point code will compile without any error.


Run the testcase
Now before you run the test case make sure that the Selenium server has started if not please start it.

Now run your test case by following command on the shell prompt.

java java org.junit.runner.JUnitCore classname

Wednesday, April 29, 2009

Selenium with JUnit.

At this point I am sure that you know how to install/setup selenium and JUnit. And how to record the test cases using selenium IDE. If you don't please refer Selenium

Till now only Selenium IDE was in picture. But now you will need all the things, Selenium RC, Java, Junit. So let's go step by step.


Export the test case to JAVA
Export the test cases in java language and save at your desired location.

Edit the test case.
Now as you have saved the test cases in JAVA, to make it run you need to the following changes.
  • Remove the first line starting with package or comment it with double slash ( // ).

  • Make sure the following lines are at top of the file.
    import com.thoughtworks.selenium.*;
    import java.util.regex.Pattern;
    import junit.framework.*;
  • Make sure the class name is same as your file name
  • You need to add three new extra methods in the code as follows

    public static Test suite() {
    return new TestSuite(GoogleSearch.class);
    }
    public void tearDown(){
    selenium.stop();
    }
    public static void main(String args[]) {
    junit.textui.TestRunner.run(suite());
    }
    Below is the code you will get when you will export the test case from selenium
    package com.example.tests;

    import com.thoughtworks.selenium.*;
    import java.util.regex.Pattern;

    public class NewTest extends SeleneseTestCase {
    public void setUp() throws Exception {
    setUp("http://www.google.com/", "*chrome");
    }
    public void testNew() throws Exception {
    selenium.open("/");
    selenium.type("q", "selenium IDE");
    selenium.click("btnG");
    selenium.waitForPageToLoad("30000");
    verifyTrue(selenium.isTextPresent("selenium-ide.seleniumhq.org"));
    selenium.click("//ol[@id='rso']/li[1]/h3/a/em");
    selenium.waitForPageToLoad("30000");
    }
    }
    And the following is the modified code ready to run with Junit
    //package com.example.tests;

    import com.thoughtworks.selenium.*;
    import java.util.regex.Pattern;
    import junit.framework.*; //added

    public class GoogleSearch extends SeleneseTestCase {
    public void setUp() throws Exception {
    setUp("http://Google.com", "*chrome");

    }
    public void testNew() throws Exception {
    selenium.open("/");
    selenium.type("q", "selenium IDE");
    selenium.click("btnG");
    selenium.waitForPageToLoad("30000");
    verifyTrue(selenium.isTextPresent("selenium-ide.seleniumhq.org"));
    //selenium.click("//ol[@id='rso']/li[1]/h3/a/em");
    selenium.click("link=Selenium IDE");
    selenium.waitForPageToLoad("30000");
    }

    public static Test suite() {
    //method added
    return new TestSuite(GoogleSearch.class);
    }
    public void tearDown(){
    //Added . Will be called when the test will complete
    selenium.stop();
    }
    public static void main(String args[]) {
    // Added. Execution will started from here.
    junit.textui.TestRunner.run(suite());
    }

    }
  • Save the file bug before you compile it make sure that classpath for both selenium and Junit is set else you will end up with compile time errors.


Set Classpath

You need to set the classpath for both selenium-java-client-driver.jar and junit-4.6.jar(file name may differ depends on the version you have downloaded).
To set the classpath just do the following
  • right click on the My Computer icon on desktop and click on properties then click on Advance Tab and then click on Environment Variables.

  • Under the System Variables click on CLASSPATH and add the full path of both the above file separated by semicolon(;).


Run the TestCase
Javac Filename.java command.
If everything goes fine your file will compile successfully without any error.
Now before you run the test cases you need to start the Selenium server. To start the server go to the command prompt and run the following command

java -jar path\selenium-server-0.9.2\selenium-server.jar -interactive

Now to run your test case open new command prompt and type the following command

java filename

Now the test case will be executed in the firefox browser.
You can also execute the same test on different browser too.
To execute it on the Internet Explorer just change the line setUp("http://Google.com", "*chrome"); from setUp() method to setUp("http://Google.com", "*iexplore"); to run it on the opera change the line to
setUp("http://Google.com", "*opera");


Troubleshooting
  1. Getting the following error while compiling the test case file.
    'javac' is not recognized as an internal or external command,operable program or batch file.
    Solution: locate the bin folder inside you jdk folder and set it's path in path environment varibale

  2. Getting following error while running the test case
    java.lang.RuntimeException: Could not contact Selenium Server; have you started it?
    Solution: This means that you haven't started the selenium server. So locate the "selenium-server.jar" file and use the following command to start the server

    java -jar path\selenium-server.jar -interactive


  3. getting following error while test case is in execution.
    com.thoughtworks.selenium.SeleniumException: Permission denied to get property Location.href
    Solution:use *chrome instead of *firefox in setup


Tuesday, April 28, 2009

Selenium


Selenium Introduction.

Selenium is a open source ( Free !!! ) tool for function/regression, unit testing the web application. It has a IDE which is actually a firefox add-ons which lets you record/playback the events and it also lets you export your test cases into the other desired ( Java, php, .net, ruby ) language for further editing.

It has three main component provided by selenium and other optional provided by third party.
  1. Selenium IDE: Require to record/playback the testcase and to export it in other language
  2. Selenium Core: Central control
  3. Selenium RC: Allows you to run your test cases from any other languages on other browsers (like IE, Opera ) and on other platforms ( Mac, Windows )
  4. Junit/Nunit: Junit is framework if you choose java to write the testcases and Nunit is if you choose to write down the testcases in .Net
  5. ANT: This is the reporting tool.
The first three of the above are main components others are optional but essential.

Installation:
Now to install and setup the selenium is bit tedious task. You need to download the following things:
Now as you have downloaded the above things, you need to install/extract them to use
  • Selenium IDE will be installed automatically if you have use firefox to download it else a .xpi file would have been downloaded. Just drad and drop the file on the firefox and it will be installed.
  • Extract the Selenium Core, Selenium RC and Junit in your desired directory.
  • install the JDK
Now after this you need to set the path and classpath environment variables.
  • Find the out the "selenium-java-client-driver.jar" from the Selenium RC folder and set its full path as classpath as below
    set path=%classpath%;full path of ""selenium-java-client-driver.jar"
  • Find out the Junit-4.6jar ( file name may differ depends on the version you have downloaded) and set it full path in the classpath variable.
  • Find out the bin located inside the Java folder and set its path in the path variable.
Now you are ready to use the selenium with Java. But before we use it with Java we will see how to record and playback the testcases using selenium IDE


Record and playback using Selenium IDE:


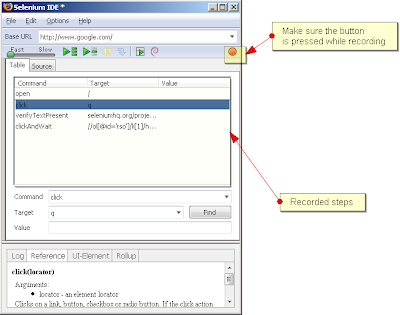
Open the Firefox and open the Selenium IDE from the tool menu. Make sure the record (red button ) is pressed
  • Now you can start recording. Navigate to the Google.com and in the search box enter "Selenium IDE" or any other text. Now click on the first text present. Now go back to the IDE you will find the recorded steps in there.
  • You need to change all the "click" command with "clickandWait". and now you can playback to see whether the recorded test cases passes or not. Just click on the green arrow button and the testcase will be loaded in browser and will be executed.