Tuesday, April 28, 2009

Selenium


Selenium Introduction.

Selenium is a open source ( Free !!! ) tool for function/regression, unit testing the web application. It has a IDE which is actually a firefox add-ons which lets you record/playback the events and it also lets you export your test cases into the other desired ( Java, php, .net, ruby ) language for further editing.

It has three main component provided by selenium and other optional provided by third party.
  1. Selenium IDE: Require to record/playback the testcase and to export it in other language
  2. Selenium Core: Central control
  3. Selenium RC: Allows you to run your test cases from any other languages on other browsers (like IE, Opera ) and on other platforms ( Mac, Windows )
  4. Junit/Nunit: Junit is framework if you choose java to write the testcases and Nunit is if you choose to write down the testcases in .Net
  5. ANT: This is the reporting tool.
The first three of the above are main components others are optional but essential.

Installation:
Now to install and setup the selenium is bit tedious task. You need to download the following things:
Now as you have downloaded the above things, you need to install/extract them to use
  • Selenium IDE will be installed automatically if you have use firefox to download it else a .xpi file would have been downloaded. Just drad and drop the file on the firefox and it will be installed.
  • Extract the Selenium Core, Selenium RC and Junit in your desired directory.
  • install the JDK
Now after this you need to set the path and classpath environment variables.
  • Find the out the "selenium-java-client-driver.jar" from the Selenium RC folder and set its full path as classpath as below
    set path=%classpath%;full path of ""selenium-java-client-driver.jar"
  • Find out the Junit-4.6jar ( file name may differ depends on the version you have downloaded) and set it full path in the classpath variable.
  • Find out the bin located inside the Java folder and set its path in the path variable.
Now you are ready to use the selenium with Java. But before we use it with Java we will see how to record and playback the testcases using selenium IDE


Record and playback using Selenium IDE:


Open the Firefox and open the Selenium IDE from the tool menu. Make sure the record (red button ) is pressed
  • Now you can start recording. Navigate to the Google.com and in the search box enter "Selenium IDE" or any other text. Now click on the first text present. Now go back to the IDE you will find the recorded steps in there.
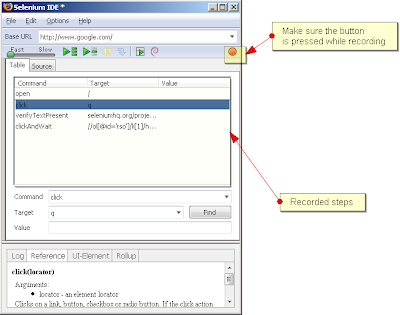
  • You need to change all the "click" command with "clickandWait". and now you can playback to see whether the recorded test cases passes or not. Just click on the green arrow button and the testcase will be loaded in browser and will be executed.

Monday, January 19, 2009

How to retrieve tooltip in QTP

Downalod the Windows Application

Couple of days ago I was visiting the SQA forum and there someone have posted the question to retrieve the tooltip of the web button. And so I find out the couple of different way to retrieve the tooptip for web objects.

Retrieve the tooltip of the Web objects:

There isn't any direct property of any of the web object that gives you the tooltip. But if you will see the source code of the object you will find out that it is the title property of th object which appears as the tooltip.

Below are the couple of ways to retrieve the tooltip.


1)Retrive the tooltip from outerhtml property

The title property resides in the OuterHtml property of any object. So what i did is, i made a function to fetch the title property as below.
Example:
This retrives the tooltip of the Edit box appears on the "Google.com" website. The same way you can retrieve the tooltip of web buttons.


SystemUtil.Run "iexplore.exe","Google.com"
outerhtml = Browser("Title:=Google").page("title:=google").webedit("name:=q").GetROProperty("outerhtml")
msgbox Find_ToolTip( outerhtml )

Function Find_ToolTip(outerhtml)
temp = RegExp("title=.*""",outerhtml)
Find_ToolTip = RegExp(""".*""",temp)
End Function


Function RegExp(patrn, strng)
Dim regEx, Match, Matches ' Create variable.
Set regEx = New RegExp ' Create a regular expression.
regEx.Pattern = patrn ' Set pattern.
regEx.IgnoreCase = True ' Set case insensitivity.
regEx.Global = True ' Set global applicability.
Set Matches = regEx.Execute(strng) ' Execute search.
If Matches.count > 0 Then
RegExp = Matches(0).Value
else
REgExp=""
End If

End Function


Yeah yeah yeah... I know this is the tedious way to retrieve the tooltip. So Then something else comes in my mind and I found out the eaistest way to retreive it.

2) Retrieve tooltip using DOM.

You can easily retrieve the title property of the object using DOM.

Example:
msgbox Browser("name:=Google").Page("title:=Google").WebEdit("name:=q").Object.title


Retrieve the tooltip of the Windows objects:

Retrieve tooltip of the windows object is easy too if you know it's class name. But you will not be able to retrieve the class name through the Object Spy that comes with the QTP.

The tooltip is windows of type tooltips_class32.

Example:
You need to download the gToolTip_Demo.zip and extract the exe file gTooltip.exe to run this example


Dialog("text:=Tool Tip Demo").WinButton("text:=OK").MouseMove 0,0
msgbox Window("nativeclass:=tooltips_class32").GetROProperty("text")

Dialog("text:=Tool Tip Demo").WinButton("text:=Cancel").MouseMove 0,0
msgbox Window("nativeclass:=tooltips_class32").GetROProperty("text")

Dialog("text:=Tool Tip Demo").WinEdit("attached text:=Password").MouseMove 0,0
msgbox Window("nativeclass:=tooltips_class32").GetROProperty("text")

Dialog("text:=Tool Tip Demo").WinEdit("attached text:=User ID","micClass:=WinEdit").MouseMove 0,0
msgbox Window("nativeclass:=tooltips_class32").GetROProperty("text")